**Update 5/5/19** This pattern has been re-written and updated. For a much better version, please visit my new website Oh Darn Yarn! See you there!
So here are some pictures of my interpretation of Snoopy's mouth (pics are clickable):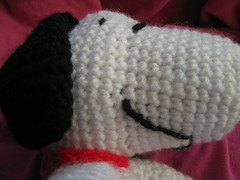
As you can see, the corner of his mouth lines up with the edge of his eyes.
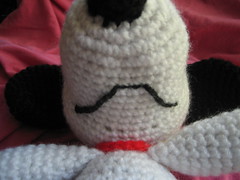
It's like an upside down bird in flight!
Here is a diagram of how I sewed the mouth on, where "^" represents where I pulled the needle up, and "v" is where I pushed it down. The numbers represent the order that I sewed the mouth. There are 4 places that my needle actually went through; those are: The 2 corners of the mouth, and 2 middle sections (where the straight line starts and ends). I'm not well versed in sewing, so this is my own little ghetto way of doing it. Hehe! Oh, to shape the mouth, I just sewed the yarn down with by inserting the needle through the bottom of closest hole, go up and around, and down through the same hole.

Of course, you can always find your own way of sewing on his mouth.
Phew. Moving on!
Ears (make 2)
With black yarn,
Sc 8 in a magic ring.
R1: 2 sc in each sc.
R2: *Sc 7, 2 sc in next sc*, twice.
R3: *Sc 8, 2 sc in next sc*, twice.
R4: *Sc 9, 2 sc in next sc*, twice.
R5: *Sc 10, 2 sc in next sc*, twice.
R6: *Sc 10, sc2tog*, twice.
R7: *Sc 9, sc2tog*, twice.
R8: *Sc 8, sc2tog*, twice.
R9: *Sc 7, sc2tog*, twice.
R10: *Sc 6, sc2tog*, twice.
R11: *Sc 5, sc2tog*, twice.
R12: Sc 1 in each sc around.
R13: Sc 1 in each sc around.
Sl st to join with next sc and finish off, leaving a long tail to sew.
Ears should be flat. You do not need to stuff them. I sewed it 3 rows above the eyebrows.
Body
With white yarn,
Sc 8 in a magic ring.
R1: 2 sc in each sc.
R2: *Sc 1, 2 sc in next sc*, repeat around.
R3: *Sc 2, 2 sc in next sc*, repeat around.
R4: *Sc 3, 2 sc in next sc*, repeat around.
R5: *Sc 4, 2 sc in next sc*, repeat around.
R6 - R7: Sc 1 in each sc around.
R8: *Sc 4, sc2tog*, repeat around.
R9: Sc 1 in each sc around.
R10: *Sc 3, sc2tog*, repeat around.
R11 - R14: Sc 1 in each sc around.
R15: *Sc 2, sc2tog*, repeat around
R16 - R17: Sc 1 in each sc around.
R18: *Sc 1, sc2tog*, repeat around.
Stuff!
R19: *Sc2tog around*
Finish off.
I will post arms and legs a little later!
I can't seem to have my ear flat...is it suppose to be crocheting in round or row? Help help
ReplyDeleteRounds. It puffy up but you just push on both side and it will be flat
DeleteDo you have the pattern for the arms, legs and tail?
DeleteI now realized what I'm suppose to do when I finish the ears :]. I'm a rookie at making amirugumi. Thank you very much for the instructions...hopefully my snoopy will come out good
ReplyDeleteHello; this is a wonderful patern. Thank you alot. But ı want to ask when you give the arms and legs patern. can you help me for this. Thanks alot.
ReplyDeleteHere is the link for arms and legs:
ReplyDeletehttp://bearbunsstudio.blogspot.com/2009/04/snoopy-crochet-pattern-part-3.html
There are not comments or instruction on the assembly of Snoopy...... Is it just a bit of put it together and see if it looks ok ?
ReplyDeleteI'm having a really hard time with the ears. are you supposed to continue in a circle? its making a bowl. haha. Help!!!
ReplyDeleteThis comment has been removed by the author.
ReplyDeleteMe encanta, te salió precioso. Gracias por compartirlo. Un saludo
ReplyDeleteYou forgot a tail
ReplyDeleteThis comment has been removed by the author.
DeleteAnnie the instructions for tail is in comments of part 3 scroll all the way down. Kaley Negron posted it...
DeleteHere ya go Annie..Tail: each increase is done in the previous increase so the tail has a curved shape
DeleteIn MR, sc 4
2sc, sc in next 3 sts – 5
2sc, sc in next 4 sts – 6
2sc, sc in next 5 sts – 7
2sc, sc in next 6 sts – 8
Sc even for 4 rows – 8 each row
Fasten off, leave 12″ tail for sewing on. I lightly stuffed the base of the tail with fiberfill.
From:
https://chibiami.wordpress.com/2008/10/25/lollypup/
When you did the head, you posted to crochet in the front and back loops, is that just for the row or for the following rows until you have to do the back loops?
ReplyDeleteHow come snoopy dont have a tail or am i missing it.
ReplyDeleteI found it nvrmnd
ReplyDeleteNorton.com NU 16
ReplyDeleteNorton NU 16
Office.com/Setup
Office.com/Setup
McAfee.com/Activate
McAfee.com/Activate
Piece of writing writing is also a excitement, if you know after that you can write or else it is difficult to write.
ReplyDeleteI adore this Snoopy. Made it in pink and blue for two siblings. Beautiful!
ReplyDeleteAwesome job
ReplyDelete